> ## Documentation Index
> Fetch the complete documentation index at: https://covalenthq.com/docs/llms.txt
> Use this file to discover all available pages before exploring further.
# Setup BSP Node
### Prerequisites for Operator nodes
Before you get started, make sure you have:
* the minimum self-stake CXT available, currently 175K CXT
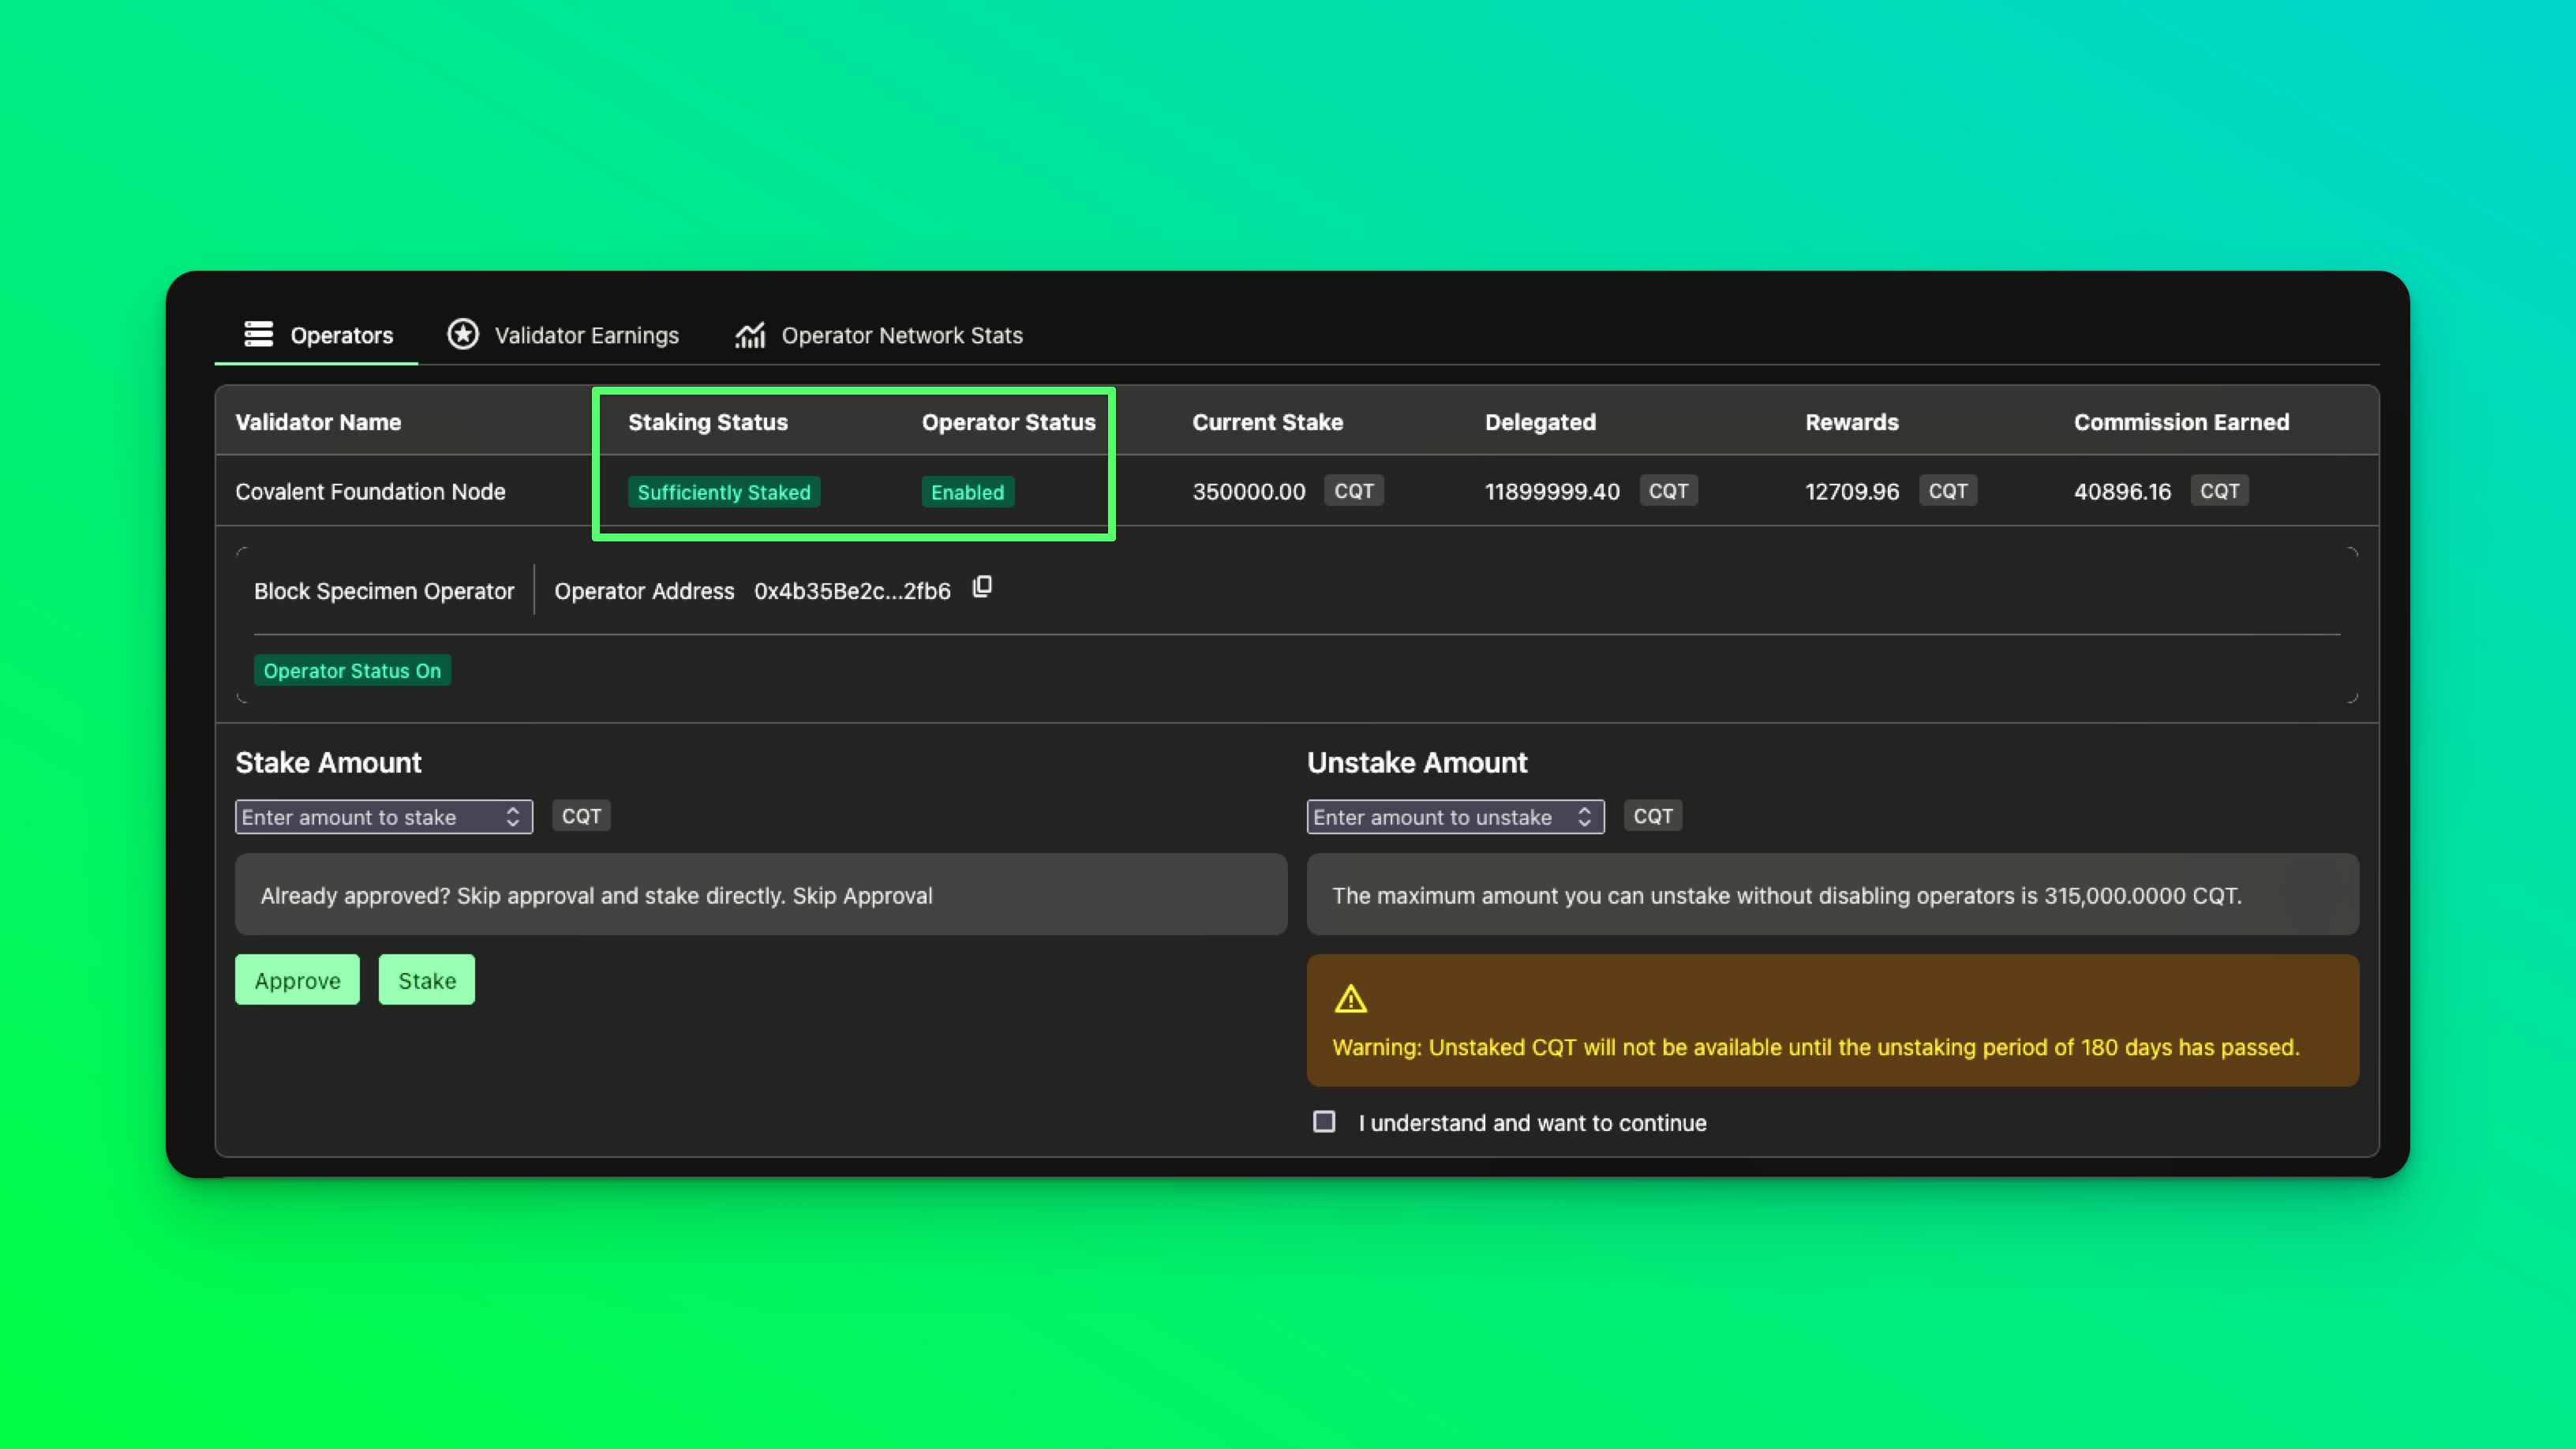
* your operator address is added and enabled on the [operator dashboard](https://www.covalenthq.com/staking/#/operator-dashboard)
 Glimmer (GLMR) is needed to pay for gas on Moonbeam in order to send proofs of block specimens and block results. This process currently costs *5 GLMR* per day. The balance should be held at the same address as the operator address.
## Install Dependencies
### MacOS 12.x (M1/Intel) Installation requirements
#### Install XCode
* You must also Install brew (for mac m1/intel)
This installs all the minimum necessary terminal/command-line tools to get started with software development on a mac.
**Complete Installation Time: 1-1.5 hrs** depending on your machine and network.
Install `Git`, `Golang`, `Redis`.
* `Git` is used as the source code version control manager across all our repositories.
* `Go` is the programming language that is used to develop on `go-ethereum` and bsp patches, the agent given below is also entirely written in Go.
* `Redis` is our in-memory database, cache and streaming service provider.
Installation steps are given for various types of OS follow the one suits best for you.
Current `Go Version: Go 1.22 or later`
#### MacOS 12.x (M1/Intel)
```shell theme={null}
brew install git go redis
```
#### Debian/Ubuntu
```shell theme={null}
wget https://golang.org/dl/go1.22.5.linux-amd64.tar.gz
tar -xvf go1.22.5.linux-amd64.tar.gz
sudo mv go /usr/local
echo "" >> ~/.bashrc
echo 'export GOPATH=$HOME/go' >> ~/.bashrc
echo 'export GOROOT=/usr/local/go' >> ~/.bashrc
echo 'export GOBIN=$GOPATH/bin' >> ~/.bashrc
echo 'export PATH=$PATH:/usr/local/go/bin:$GOBIN' >> ~/.bashrc
echo 'export GO111MODULE=on' >> ~/.bashrc
source .bashrc
# install redis and git
apt install git redis-server
```
#### Fedora
```shell theme={null}
dnf install git golang redis
```
#### RHEL/CentOS
Install Git, Golang, Redis
```shell theme={null}
yum install git go-toolset redis
```
#### OpenSUSE/SLES
Install Git, Golang, Redis
```shell theme={null}
zypper addrepo https://download.opensuse.org/repositories/devel:languages:go/openSUSE_Leap_15.3/devel:languages:go.repo
zypper refresh
zypper install git go redis
```
After Installing the dependencies mentioned above according to your OS needs, Follow these steps to setup the environment.
Glimmer (GLMR) is needed to pay for gas on Moonbeam in order to send proofs of block specimens and block results. This process currently costs *5 GLMR* per day. The balance should be held at the same address as the operator address.
## Install Dependencies
### MacOS 12.x (M1/Intel) Installation requirements
#### Install XCode
* You must also Install brew (for mac m1/intel)
This installs all the minimum necessary terminal/command-line tools to get started with software development on a mac.
**Complete Installation Time: 1-1.5 hrs** depending on your machine and network.
Install `Git`, `Golang`, `Redis`.
* `Git` is used as the source code version control manager across all our repositories.
* `Go` is the programming language that is used to develop on `go-ethereum` and bsp patches, the agent given below is also entirely written in Go.
* `Redis` is our in-memory database, cache and streaming service provider.
Installation steps are given for various types of OS follow the one suits best for you.
Current `Go Version: Go 1.22 or later`
#### MacOS 12.x (M1/Intel)
```shell theme={null}
brew install git go redis
```
#### Debian/Ubuntu
```shell theme={null}
wget https://golang.org/dl/go1.22.5.linux-amd64.tar.gz
tar -xvf go1.22.5.linux-amd64.tar.gz
sudo mv go /usr/local
echo "" >> ~/.bashrc
echo 'export GOPATH=$HOME/go' >> ~/.bashrc
echo 'export GOROOT=/usr/local/go' >> ~/.bashrc
echo 'export GOBIN=$GOPATH/bin' >> ~/.bashrc
echo 'export PATH=$PATH:/usr/local/go/bin:$GOBIN' >> ~/.bashrc
echo 'export GO111MODULE=on' >> ~/.bashrc
source .bashrc
# install redis and git
apt install git redis-server
```
#### Fedora
```shell theme={null}
dnf install git golang redis
```
#### RHEL/CentOS
Install Git, Golang, Redis
```shell theme={null}
yum install git go-toolset redis
```
#### OpenSUSE/SLES
Install Git, Golang, Redis
```shell theme={null}
zypper addrepo https://download.opensuse.org/repositories/devel:languages:go/openSUSE_Leap_15.3/devel:languages:go.repo
zypper refresh
zypper install git go redis
```
After Installing the dependencies mentioned above according to your OS needs, Follow these steps to setup the environment.
Let’s now start with Environment Setup before running Node, Here, you need to setup the following;
1. BSP-Geth & Lighthouse
2. DAS-Pinner Setup
3. BSP-Agent Setup
### 1. BSP-Geth & Lighthouse Setup :
Note: The current **BSP-Geth** version is **v2.2.0-bsp**. For the latest updates or additional details, please check the announcements or discussions in **Discord**.
Clone the [covalenthq/bsp-geth](https://github.com/covalenthq/bsp-geth/) repo
```shell theme={null}
git clone https://github.com/covalenthq/bsp-geth.git
cd bsp-geth
```
Build geth (install go if you don’t have it) and other geth developer tools from the root repo with (if you need all the geth related development tools run make all )
```shell theme={null}
make geth
```
Build geth (install go if you don’t have it) and other geth developer tools from the root repo with (if you need all the geth related development tools run make all )
```shell theme={null}
brew services start redis
==Successfully started `redis` (label: homebrew.mxcl.redis)
On Linux:
systemctl start redis
```
Start `redis-cli` in a separate terminal so you can see the encoded bsps as they are fed into redis streams.
We are now ready to start accepting stream message into redis local
```shell theme={null}
redis-cli
127.0.0.1:6379>
```
* Go back to `~/bsp-geth` and start geth with the given configuration, here we specify the replication targets (block specimen targets) with Redis stream topic key replication, in snap syncmode.
* Prior to executing, please replace `$PATH_TO_GETH_MAINNET_CHAINDATA` with the location of the mainnet snapshot that you will be downloading in the next step via lighthouse. Everything else remains the same as given below.
* Please review the flags and use them according to your system need
Each of the bsp flags and their functions is described below
`--mainnet` - lets geth know which network to synchronize with, this can be `--ropsten`, `--goerli` etc
`--discv5=true`- Enables the node to participate in the Ethereum network's Discovery v5 protocol, which is used for finding peers.
`--txlookuplimit` - Disables the limitation on how far back in the chain transactions are indexed, allowing for retrieval of transaction data from any block in the node’s history.
`--cache` - Sets the memory allocation for the node's cache in megabytes, which is used to improve performance by holding recently accessed data.
`--syncmode` - this flag is used to enable different syncing strategies for geth and a full sync allows us to execute every block from block 0; while snap allows us to execute from live blocks
`--light.ingress` - Limits the bandwidth in kilobytes per second that the node dedicates to serving light clients on Ingress (incoming traffic).
`--light.egress` - Limits the bandwidth in kilobytes per second that the node dedicates to serving light clients on Egress (outgoing traffic).
`--light.maxpeers` - Sets the maximum number of light client peers that the node can connect to.
`--http` - Enable the HTTP-RPC server
`--http.addr` - HTTP-RPC server listening interface (default: localhost)
`--http.api` - API's offered over the HTTP-RPC interface(default: eth,net,web3)
`--http.vhosts` - Allows all virtual hostnames to access the HTTP-RPC server, effectively disabling the host-based security check.
`--ws` - Enable the WS-RPC server
`--ws.addr` - WS-RPC server listening interface (default: localhost)
`--ws.api` - API's offered over the WS-RPC interface (default: eth,net,web3)
`--ws.origins` - Origins from which to accept WebSocket requests
`--datadir` - specifies a local datadir path for geth (note we use “bsp” as the directory name with the Ethereum directory), this way we don’t overwrite or touch other previously synced geth libraries across other chains
`--authrpc.jwtsecret` - Specifies the path to the JWT secret file used for authentication in the RPC API, providing an additional layer of security by requiring tokens for access.
`--replication.targets` - this flag points to redis, and lets the bsp know where and how to send the bsp messages (this flag will not function without the usage of either one or both of the flags below if both are selected a full block-replica is exported)
`--replica.result` - this flag lets the bsp know if all fields related to the block-result specification need to be exported (if only this flag is selected the exported object is a block-result)
`--replica.specimen` - this flag lets the bsp know if all fields related to the block-specimen specification need to be exported (if only this flag is selected the exported object is a block-specimen)
`—replica.blob` - Enables the extraction of blob specimens as part of the complete block specimen export, which includes state specimens and transaction receipts, collectively referred to as a block replica. This flag is used to include additional block content, particularly useful for nodes participating in more extensive data analysis or archiving, ensuring comprehensive block data is available for these purposes.
`--log.file` - specifies the file location where the log files have to be placed. In case of error (like permission errors), the logs are not recorded in files.
Sample Service systemmd file for [BSP-Geth](https://www.covalenthq.com/docs/nodes/block-specimen-producer-onboarding/run-bsp-node#bsp-geth-service-unit-file) can be found here.
```shell theme={null}
./build/bin/geth
--mainnet \
--log.debug \
--v5disc=true \
--txlookuplimit=0 \
--cache=8192 \
--syncmode=snap \
--light.ingress=200 \
--light.egress=200 \
--light.maxpeers=3 \
--http=true \
--http.addr=localhost \
--http.api=admin,debug,eth,net,web3,txpool \
--http.vhosts=* \
--ws=true \
--ws.addr=localhost \
--ws.api=admin,debug,eth,net,web3,txpool \
--ws.origins=* \
--datadir=$PATH_TO_GETH_MAINNET_CHAINDATA \
--authrpc.jwtsecret= $PATH_TO_GETH_MAINNET_CHAINDATA/geth/jwtsecret \
--replication.targets=redis://127.0.0.1:6379/0?topic=replication \
--replica.result \
--replica.specimen \
--replica.blob \
--log.file=$PATH_TO_GETH_MAINNET_CHAINDATA/geth/log.log
```
bsp-geth also needs a consensus client. We’ve tested and found the lighthouse to be stable and works well. Goto the [installation instructions](https://lighthouse-book.sigmaprime.io/installation.html) to install it.
There are multiple versions of lighhouse available Recommended is to use Pre-built binaries -> releases on github -> Then find a version where the Breaking Changes are none (i.e currently Summer Smith Prime v7.0.1) or you can ask us on the discord for assistance with the version.
Then run the lighthouse using:
Note: The current **lighthouse** stable version is **v7.0.1**. For the latest updates or additional details, please check the announcements or discussions in **Discord**.
Sample Service systemmd file for [lighthouse](https://www.covalenthq.com/docs/nodes/block-specimen-producer-onboarding/run-bsp-node#lighthouse-service-unit-file) can be found here.
```shell theme={null}
lighthouse bn \
--network mainnet \
--execution-endpoint http://localhost:8551 \
--execution-jwt $PATH_TO_GETH_MAINNET_CHAINDATA/geth/jwtsecret \
--checkpoint-sync-url https://mainnet.checkpoint.sigp.io \
--disable-deposit-contract-sync
```
Wait for the `eth blockchain` to sync to the tip. Connect to the node’s ipc instance to check how far the node is synced
```shell theme={null}
./build/bin/geth attach $PATH_TO_GETH_MAINNET_CHAINDATA/geth.ipc
```
Once connected, wait for the node to reach the highest known block to start creating live block specimens
```shell theme={null}
Welcome to the Geth JavaScript console!
instance: Geth/v1.15.11-stable-94f6ae31/linux-amd64/go1.24.0
at block: 22433567 (Wed May 07 2025 18:38:59 GMT+0000 (UTC))
datadir: /scratch/bsp
modules: admin:1.0 debug:1.0 engine:1.0 eth:1.0 miner:1.0 net:1.0 rpc:1.0 txpool:1.0 web3:1.0
To exit, press ctrl-d or type exit
> eth.syncing
{
currentBlock: 22433567,
healedBytecodeBytes: 0,
healedBytecodes: 0,
healedTrienodeBytes: 0,
healedTrienodes: 0,
healingBytecode: 0,
healingTrienodes: 0,
highestBlock: 22433567,
startingBlock: 22432567,
syncedAccountBytes: 0,
syncedAccounts: 0,
syncedBytecodeBytes: 0,
syncedBytecodes: 0,
syncedStorage: 0,
syncedStorageBytes: 0
}
```
Now wait till you see a log from the terminal here with something like this:
```shell theme={null}
INFO [04-11|16:35:48.554|core/chain_replication.go:317] Replication progress sessID=1 queued=1 sent=10960 last=0xffc46213ccd3c55b75f73a0bc29c25780eb37f04c9f2b88179e9d0fb889a4151
INFO [04-11|16:36:04.183|core/blockchain_insert.go:75] Imported new chain segment blocks=1 txs=63 mgas=13.147 elapsed=252.747ms mgasps=52.015 number=10,486,732 hash=8b57c8..bd5c79 dirty=255.49MiB
INFO [04-11|16:36:04.189|core/block_replica.go:41] Creating Block Specimen Exported block=10,486,732 hash=0x8b57c8606d74972c59c56f7fe672a30ed6546fc8169b6a2504abb633aebd5c79
INFO [04-11|16:36:04.189|core/rawdb/chain_iterator.go:338] Unindexed transactions blocks=1 txs=9 tail=8,136,733 elapsed="369.12µs"
```
This can take a few days or a few hours depending on if the source chaindata is already available at the datadir location or live sync is being attempted from scratch for a new copy of blockchain data obtained from syncing with peers. In the case of the latter the strength of the network and other factors that affect the Ethereum network devp2p protocol performance can further cause delays. Once blockchain data state sync is complete and eth.syncing returns false. You can expect to see block-specimens in the redis stream. The following logs are captured from bsp-geth service as the node begins to export live Block Specimens.
The last two logs show that new block replicas containing the block specimens are being produced and streamed to the redis topic `replication`. After this you can check that redis is stacking up the bsp messages through the redis-cli with the command below (this should give you the number of messages from the stream)
```shell theme={null}
$ redis-cli
127.0.0.1:6379> xlen replication
11696
```
If it doesn’t - the BSP producer isn't producing messages! In this case please look at the logs above and see if you have any WARN / DEBUG logs that can be responsible for the disoperation. For quick development iteration and faster network sync - enable a new node key to quickly re-sync with the ethereum network for development and testing by going to the root of `go-ethereum` and running the bootnode helper.
NOTE: To use the bootnode binary execute make all in place of make geth, this creates all the additional helper binaries that bsp-geth ships with.
```shell theme={null}
./build/bin/bootnode -genkey ~/.ethereum/bsp/geth/nodekey
```
### 2. DAS-Pinner Setup
DAS-Pinner serves as the interface to the storage layer of the network. It's a lightweight IPFS service that stores and pins data on the IPFS network using web3.storage. It is designed to work seamlessly with the DAS Light-Client, enabling the retrieval of data from the IPFS network and its verification using the DAS protocol.
It is meant for uploading/fetching network artifacts (like block specimens and block results or any other processed block data) files of the Covalent Decentralized Network.
Current : `Go Version: go1.22 or later` , this could change later in time please cross check with operator-releases channel on discord for correct versions.
Note: The current **DAS-Pinner** stable version is **v0.17.6**. For the latest updates or additional details, please check the announcements or discussions in **Discord**.
Clone and build [das-pinner](https://github.com/covalenthq/ewm-das/) (in a separate folder) We store the block specimens in the ipfs network. Bsp-agent interacts with the das-pinner server to handle the storage/retrieval needs of the network.
```shell theme={null}
$ cd ..
$ git clone https://github.com/covalenthq/ewm-das.git
$ cd ewm-das
$ git checkout tags/v0.17.6 ## update if newer release is announced
$ ./install-trusted-setup.sh
$ make build-pinner
```
Setting up w3cli
`Software Prerequisite - Node.Js version 18 or higher and npm version 7`
* **Install w3cli Version 7.9.1:**
To install version 7.9.1 of the w3cli tool globally on your system, run the following command:
```shell theme={null}
npm install -g @web3-storage/w3cli@v7.9.1
```
* Troubleshooting:
If you encounter any issues, such as missing dependencies, try clearing the npm cache and reinstalling w3cli:
```shell theme={null}
npm cache clean --force
npm uninstall -g @web3-storage/w3cli
npm install -g @web3-storage/w3cli@v7.9.1
```
Additionally, you can manually install any missing dependencies.
```shell theme={null}
npm install -g crypto-random-string
```
Get the agent key, did and delegation proof from Covalent, then you can run the ipfs-pinner
ipfs-pinner can be run as a server and allows two functionalities currently - `/get` and `/upload`
With this, the ipfs-pinner is setup and can `upload/fetch` network artifacts.
Sample Service systemmd file for [ipfs-pinner](https://www.covalenthq.com/docs/nodes/block-specimen-producer-onboarding/run-bsp-node#ipfs-pinner-service-unit-file) can be found here.
```shell theme={null}
$ cat .envrc
export AGENT_KEY="<>"
export W3_DELEGATION_FILE="<< ASK_ON_DISCORD>>"
$ ./build/bin/server -w3-agent-key -w3-delegation-file
```
### 3. BSP-Agent Setup:
#### Install Dependencies
* Install direnv
#### MacOS 12.x (M1/Intel)
```shell theme={null}
brew install direnv
```
#### Debian/Ubuntu
```shell theme={null}
apt install direnv
```
#### Fedora
```shell theme={null}
dnf install direnv
```
#### RHEL/CentOS
```shell theme={null}
yum install direnv
```
#### SLES/OpenSUSE
```shell theme={null}
zypper install direnv
```
`direnv` manages and controls sensitive information for the agent, such as Ethereum private keys for operator accounts on the Covalent Network and Redis access passwords. This is crucial since these applications, exposed on HTTP ports, must not log sensitive data.
To enable direnv on your machine add these to your `~./bash_profile` or `~./zshrc` depending on which you use as your default shell after installing it using brew.
For bash users - add the following line to your `~/.bashrc`
For zsh users - add the following line to your `~/.zshrc`
```bash bash theme={null}
eval "$(direnv hook bash)"
```
```bash zsh theme={null}
eval "$(direnv hook zsh)"
```
After adding this line do not forget to source your bash / powershell config with the following, by running it in your terminal.
```bash bash theme={null}
source ~/.bashrc
```
```bash zsh theme={null}
source ~/.zshrc
```